

Creating a Find new people campaign
The Find new people campaign is the most direct way to generate new leads on LinkedIn: you define your ideal customer profile, and GetRaze finds, collects and invites the profiles automatically.
The full flow has four moments: define the audience → review and create → check the sample → track the collection and activate.
Before you start
- Have a LinkedIn account connected to the platform — see Connecting Channels;
- Have an AI agent set up to handle the campaign — or use the Start without an agent shortcut, described in Step 2, which builds a simple agent on the spot;
- If you don't know the contact sources yet, see LinkedIn campaign types.
Step 1 — Define your ideal customer profile
In the LinkedIn area, click New Campaign and, under Contact source, choose Find new people. Step 1 of 2 opens, called Target audience — describe the audience and review the generated filters before collecting.
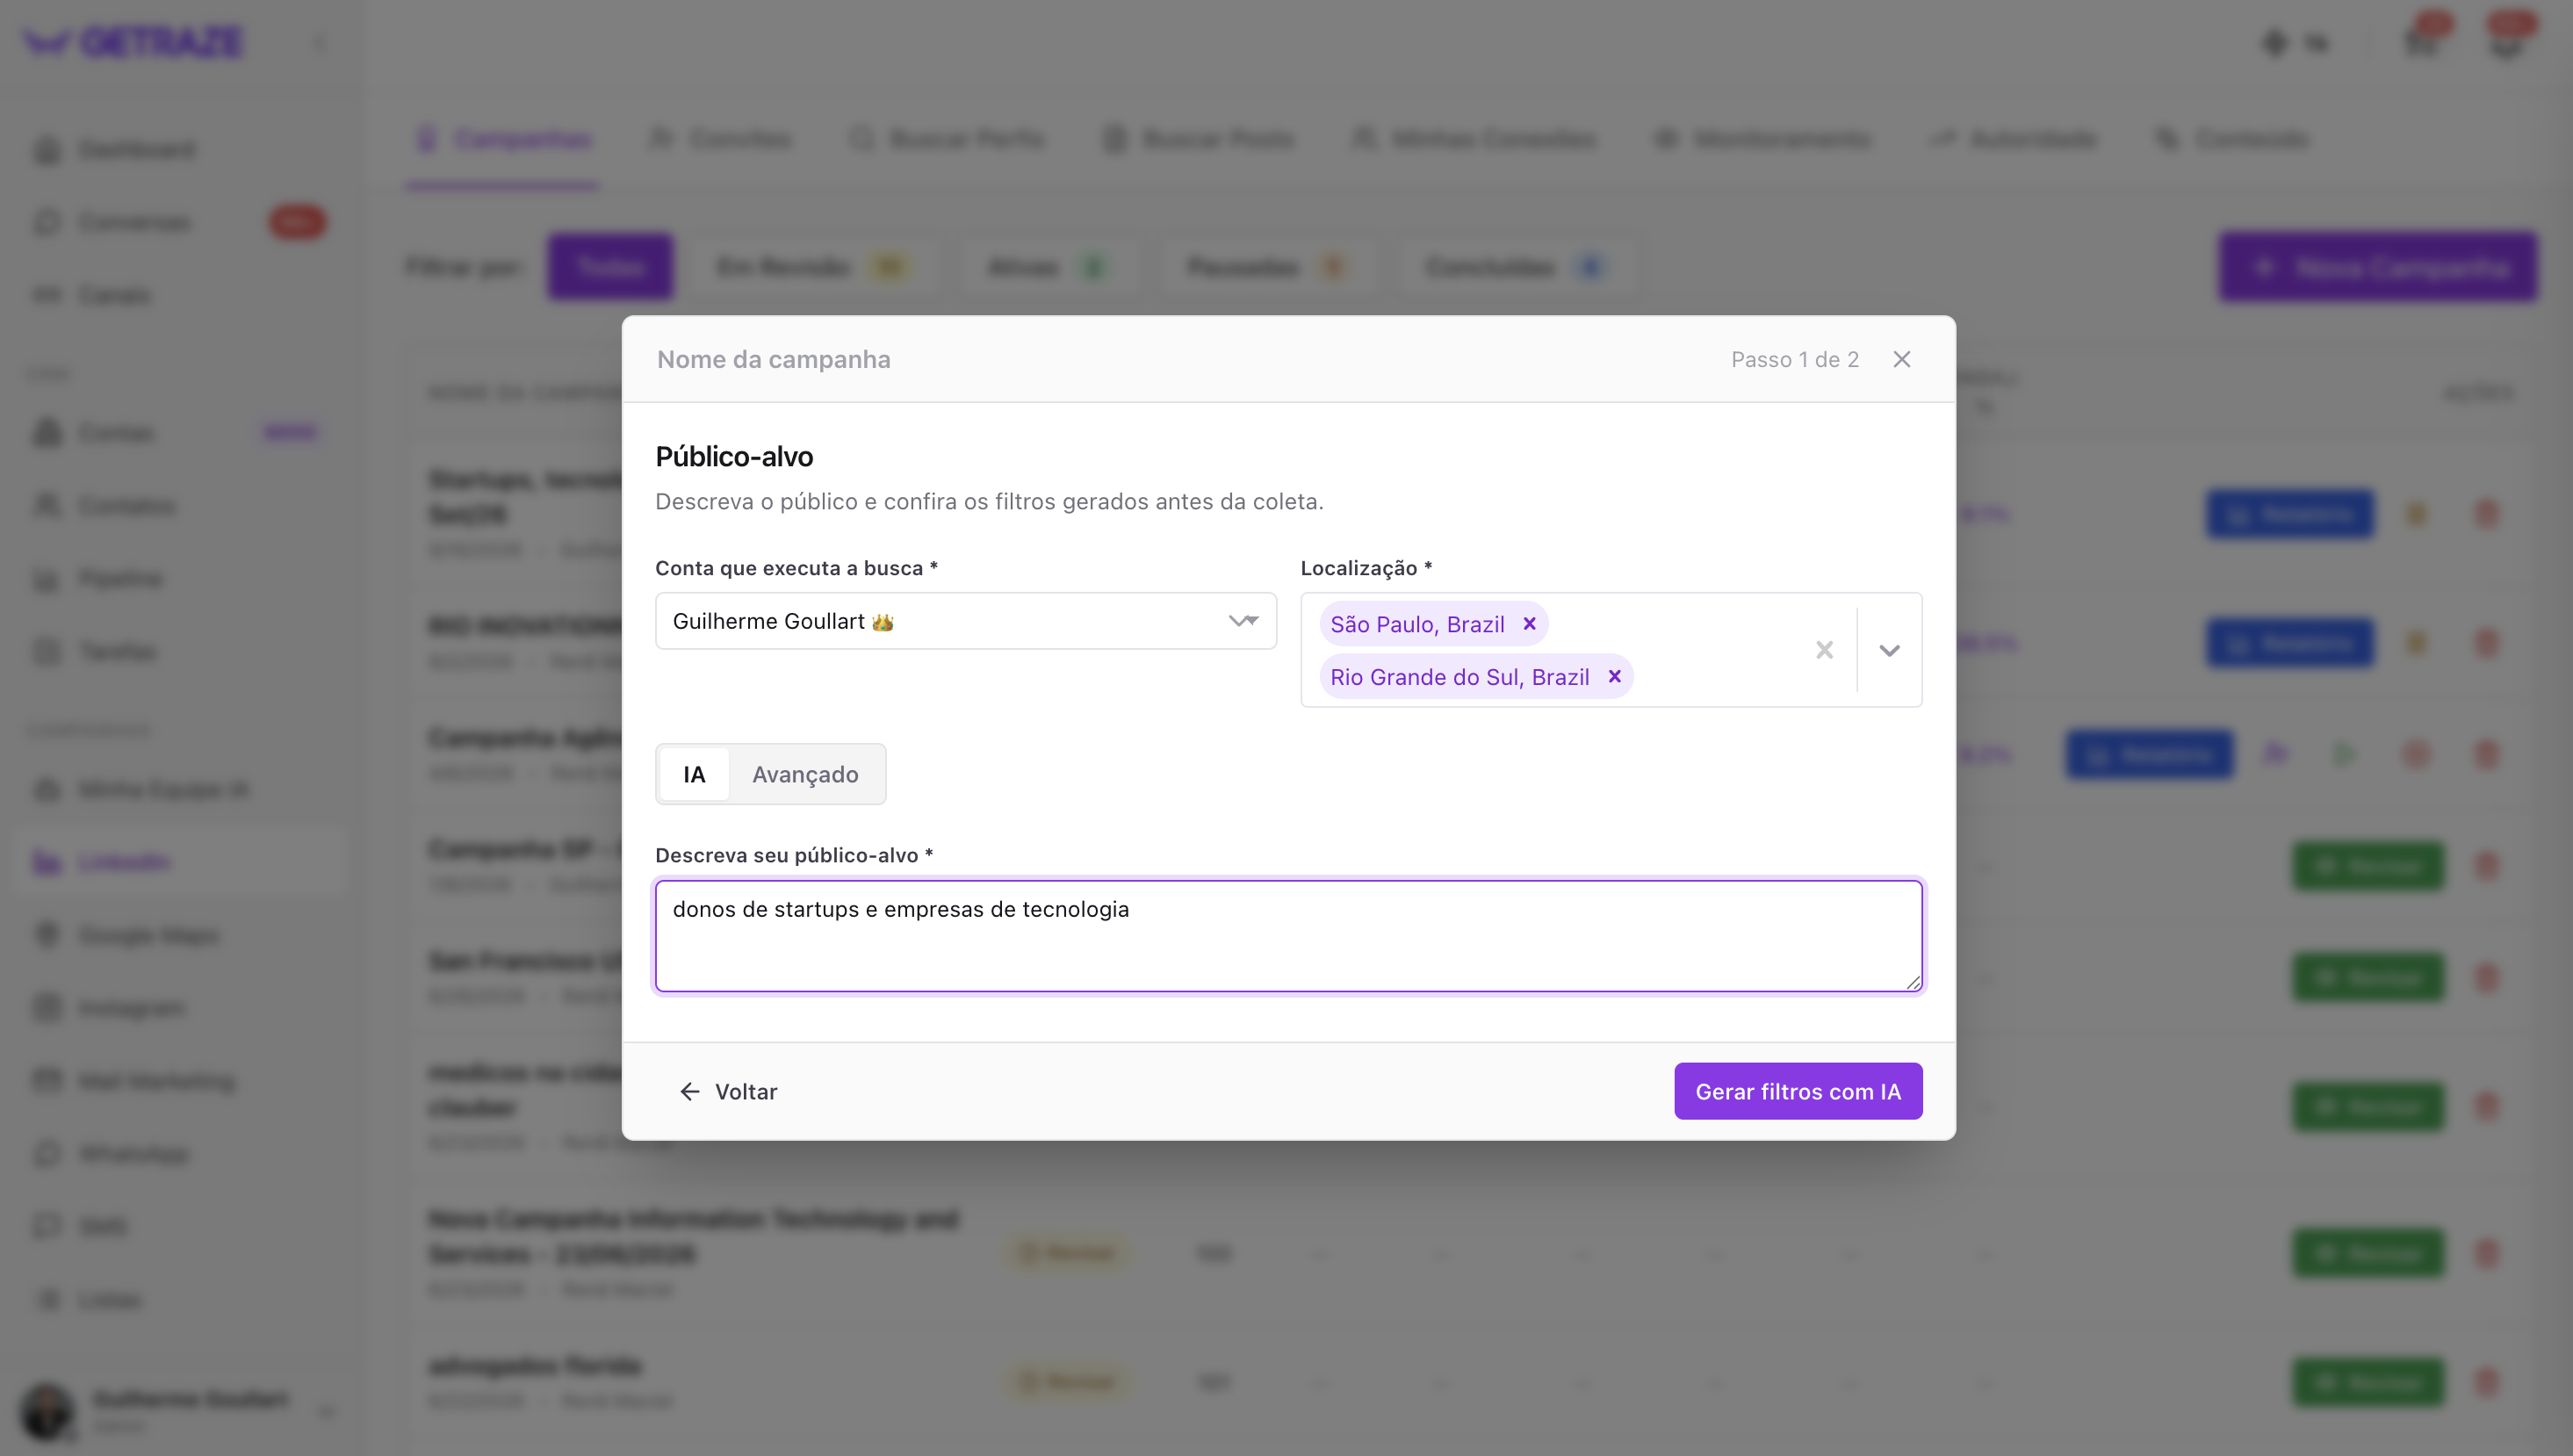
- Campaign name — at the top of the window. You can name it now or keep the name the platform builds from the filters.
- Account running the search — choose the LinkedIn account that will run the search.
- Location — type the name of a city, state or country. You can add more than one location: your search can cover several cities, states or countries at the same time.
- Choose how to define the audience, switching between AI and Advanced.
AI
Describe your target audience in your own words — for example, "owners of startups and tech companies" — and click Generate filters with AI. Based on your description, GetRaze automatically:
- Identifies the LinkedIn job titles that match your search;
- Defines the corresponding industries;
- Suggests the search keywords.
The generated filters show up in the next step, where you review them and remove what doesn't fit.
Advanced
Here you don't describe the job title in free text. Instead, you can:
- Include specific LinkedIn job titles;
- Define industries (optional);
- Or run a company search.
Premium filters
⚠️ Available only for campaigns that use Sales Navigator or Recruiter accounts.
With them, you can refine even further, defining for example:
- Past companies the person worked at;
- Schools where they studied;
- Profile language.
Step 2 — Review and create
The Review and create screen is where you check the whole setup before starting the collection. It is also where the most important result of the previous step shows up: GetRaze splits your search into distinct audiences — the niches it identified — and lets you adjust each one.
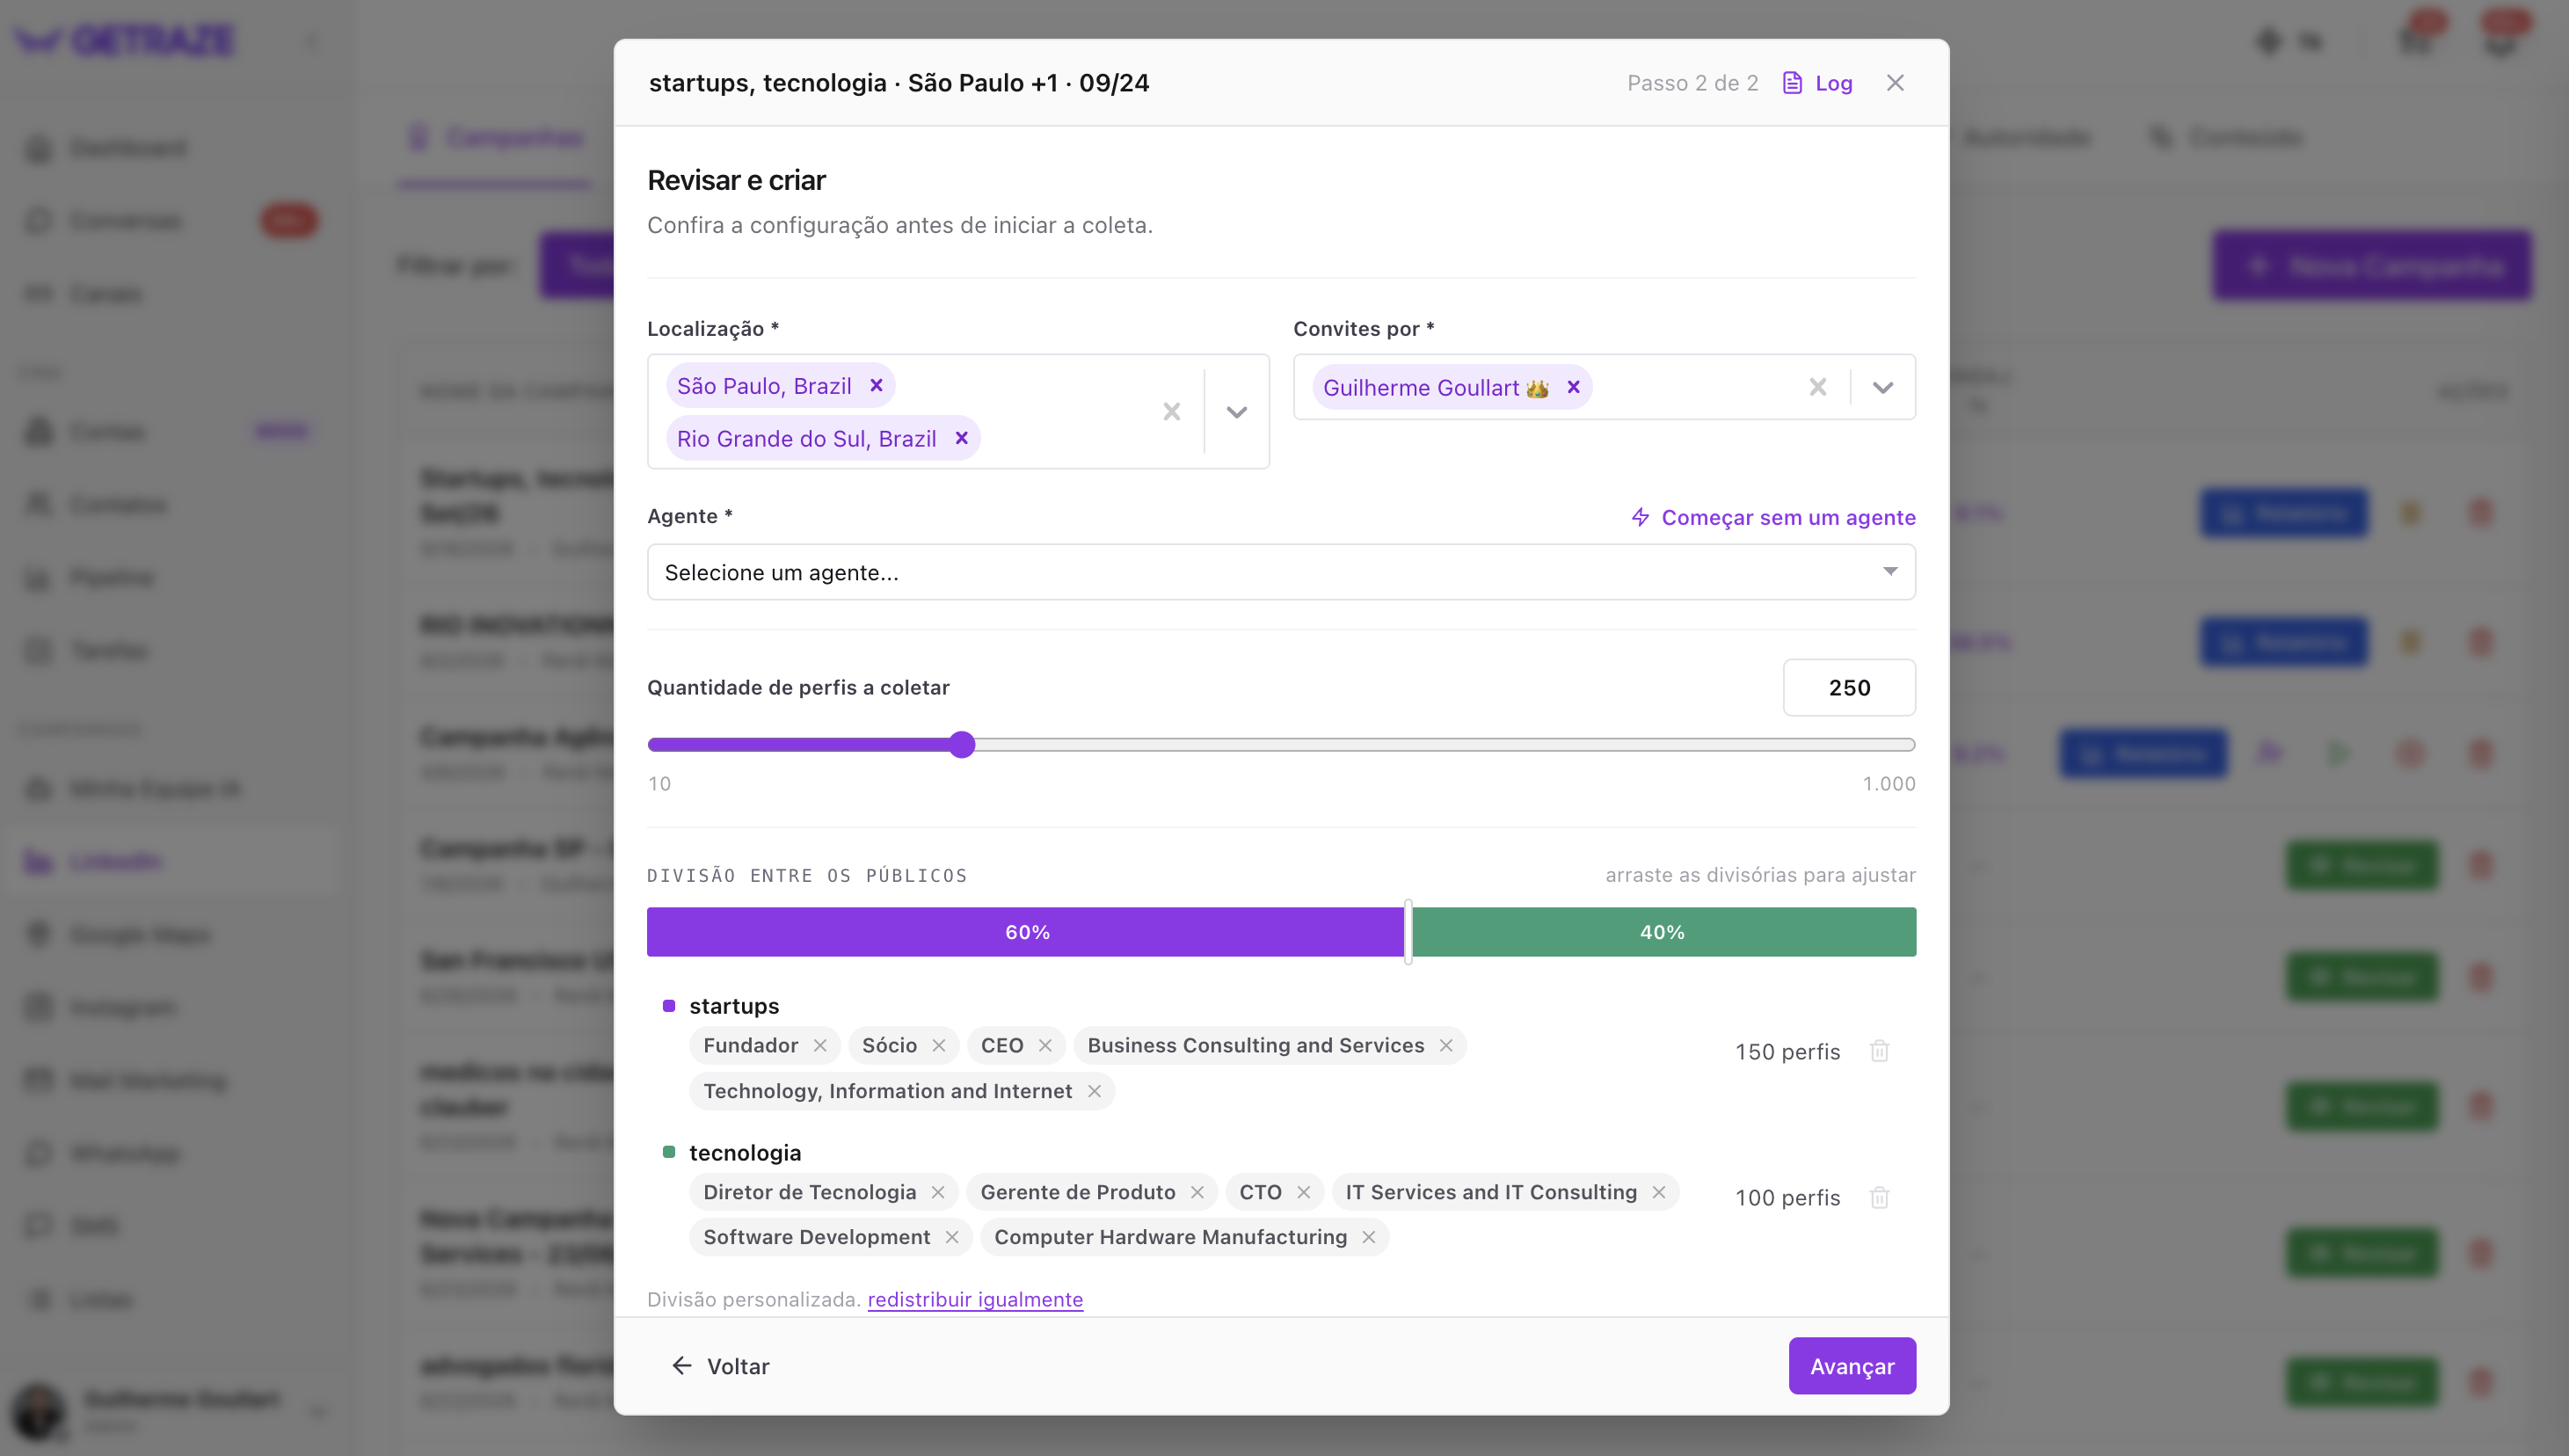
At the top, confirm the campaign details:
| Field | What it is |
|---|---|
| Location | The cities, states or countries in the search — you can remove or add them right here |
| Invites from | The LinkedIn account (or accounts) that will send the invites |
| Agent | The AI agent responsible for handling the campaign — or Start without an agent |
| Number of profiles to collect | Drag the control: minimum of 10 and maximum of 1,000 profiles at a time |
💡 When you select more than one account in Invites from, invites are distributed evenly across them. And if an account is already active in another campaign, its daily limit is split across the campaigns, to keep sending within the safe limit.
Split across audiences
Below, the Split across audiences bar shows how the profiles to collect will be divided among the niches found — for example, 60% for one audience and 40% for another. Drag the dividers to change the proportion, and the number of profiles for each audience is recalculated instantly.
Each audience lists the job titles and industries that make it up. This is where you do the fine cleanup:
- Click the × on a job title or industry that doesn't make sense for that audience, and it is removed from the search;
- Use the trash can on the right to remove an entire audience;
- Custom split → split evenly sets the proportion back to equal parts.
If something is wrong in the audience definition, click Back and redo Step 1. When you are satisfied, click Next to see the profile preview.
Start without an agent
If you don't have an AI agent ready yet, click ⚡ Start without an agent, next to the Agent field. GetRaze builds a simple funnel on the spot — invite + thank-you + distribution — and the campaign runs without AI.
💡 This creates a simple agent in AI Employees, which you can evolve later. It is not a one-way street: it is a starting point.
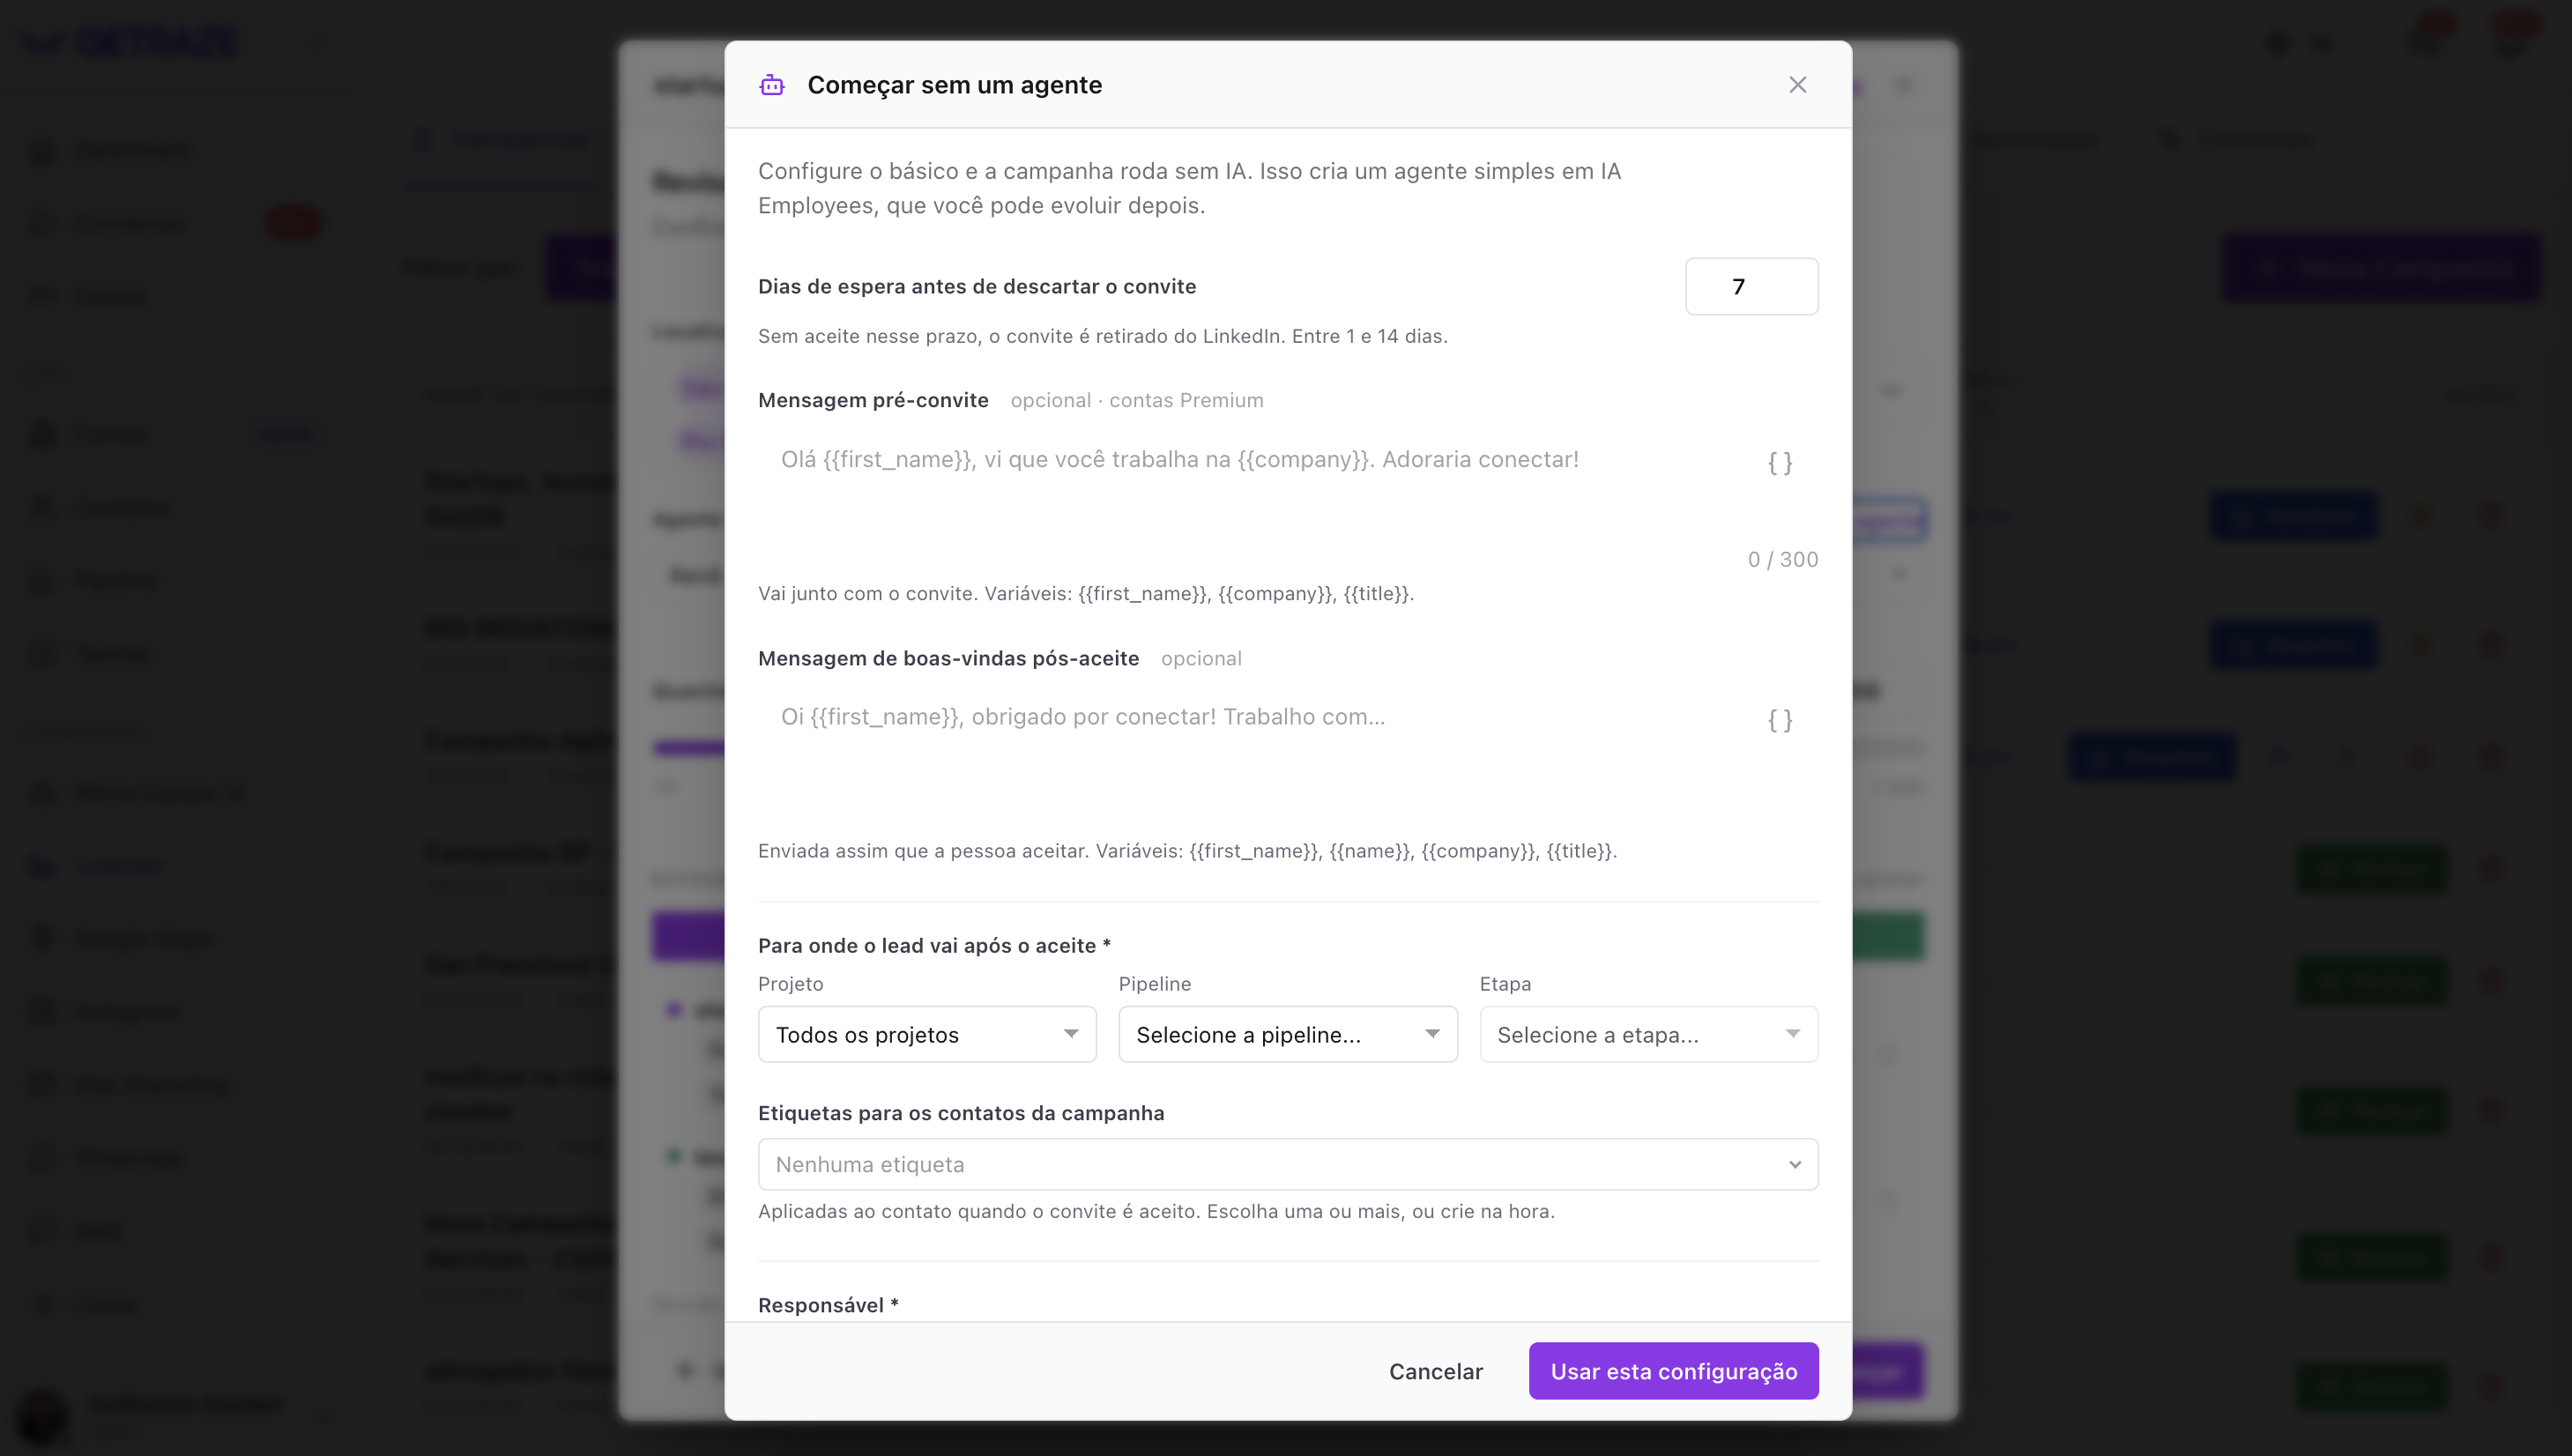
| Field | What it defines |
|---|---|
| Days to wait before discarding the invite | If not accepted within this window, the invite is withdrawn from LinkedIn. Between 1 and 14 days |
| Pre-invite message (optional, Premium accounts) | Goes along with the invite, up to 300 characters. Variables: {{first_name}}, {{company}}, {{title}} |
| Welcome message after acceptance (optional) | Sent as soon as the person accepts. Variables: {{first_name}}, {{name}}, {{company}}, {{title}} |
| Where the lead goes after acceptance | Destination Project, Pipeline and Stage in the CRM |
| Tags for the campaign's contacts | Applied to the contact when the invite is accepted — choose one or more, or create them on the spot |
| Owner | Sector (round robin) or Specific user. Whoever receives the leads is also the owner of the conversation |
Click Use this setup to go back to the review screen with the agent already filled in.
Step 3 — Check the search sample
Before creating the campaign, the Search sample shows who will be prospected with the filters you defined.
💡 The sample brings one page per audience and does not consume credits. The real collection uses exactly the same filters — so what you see here is representative of what is coming.
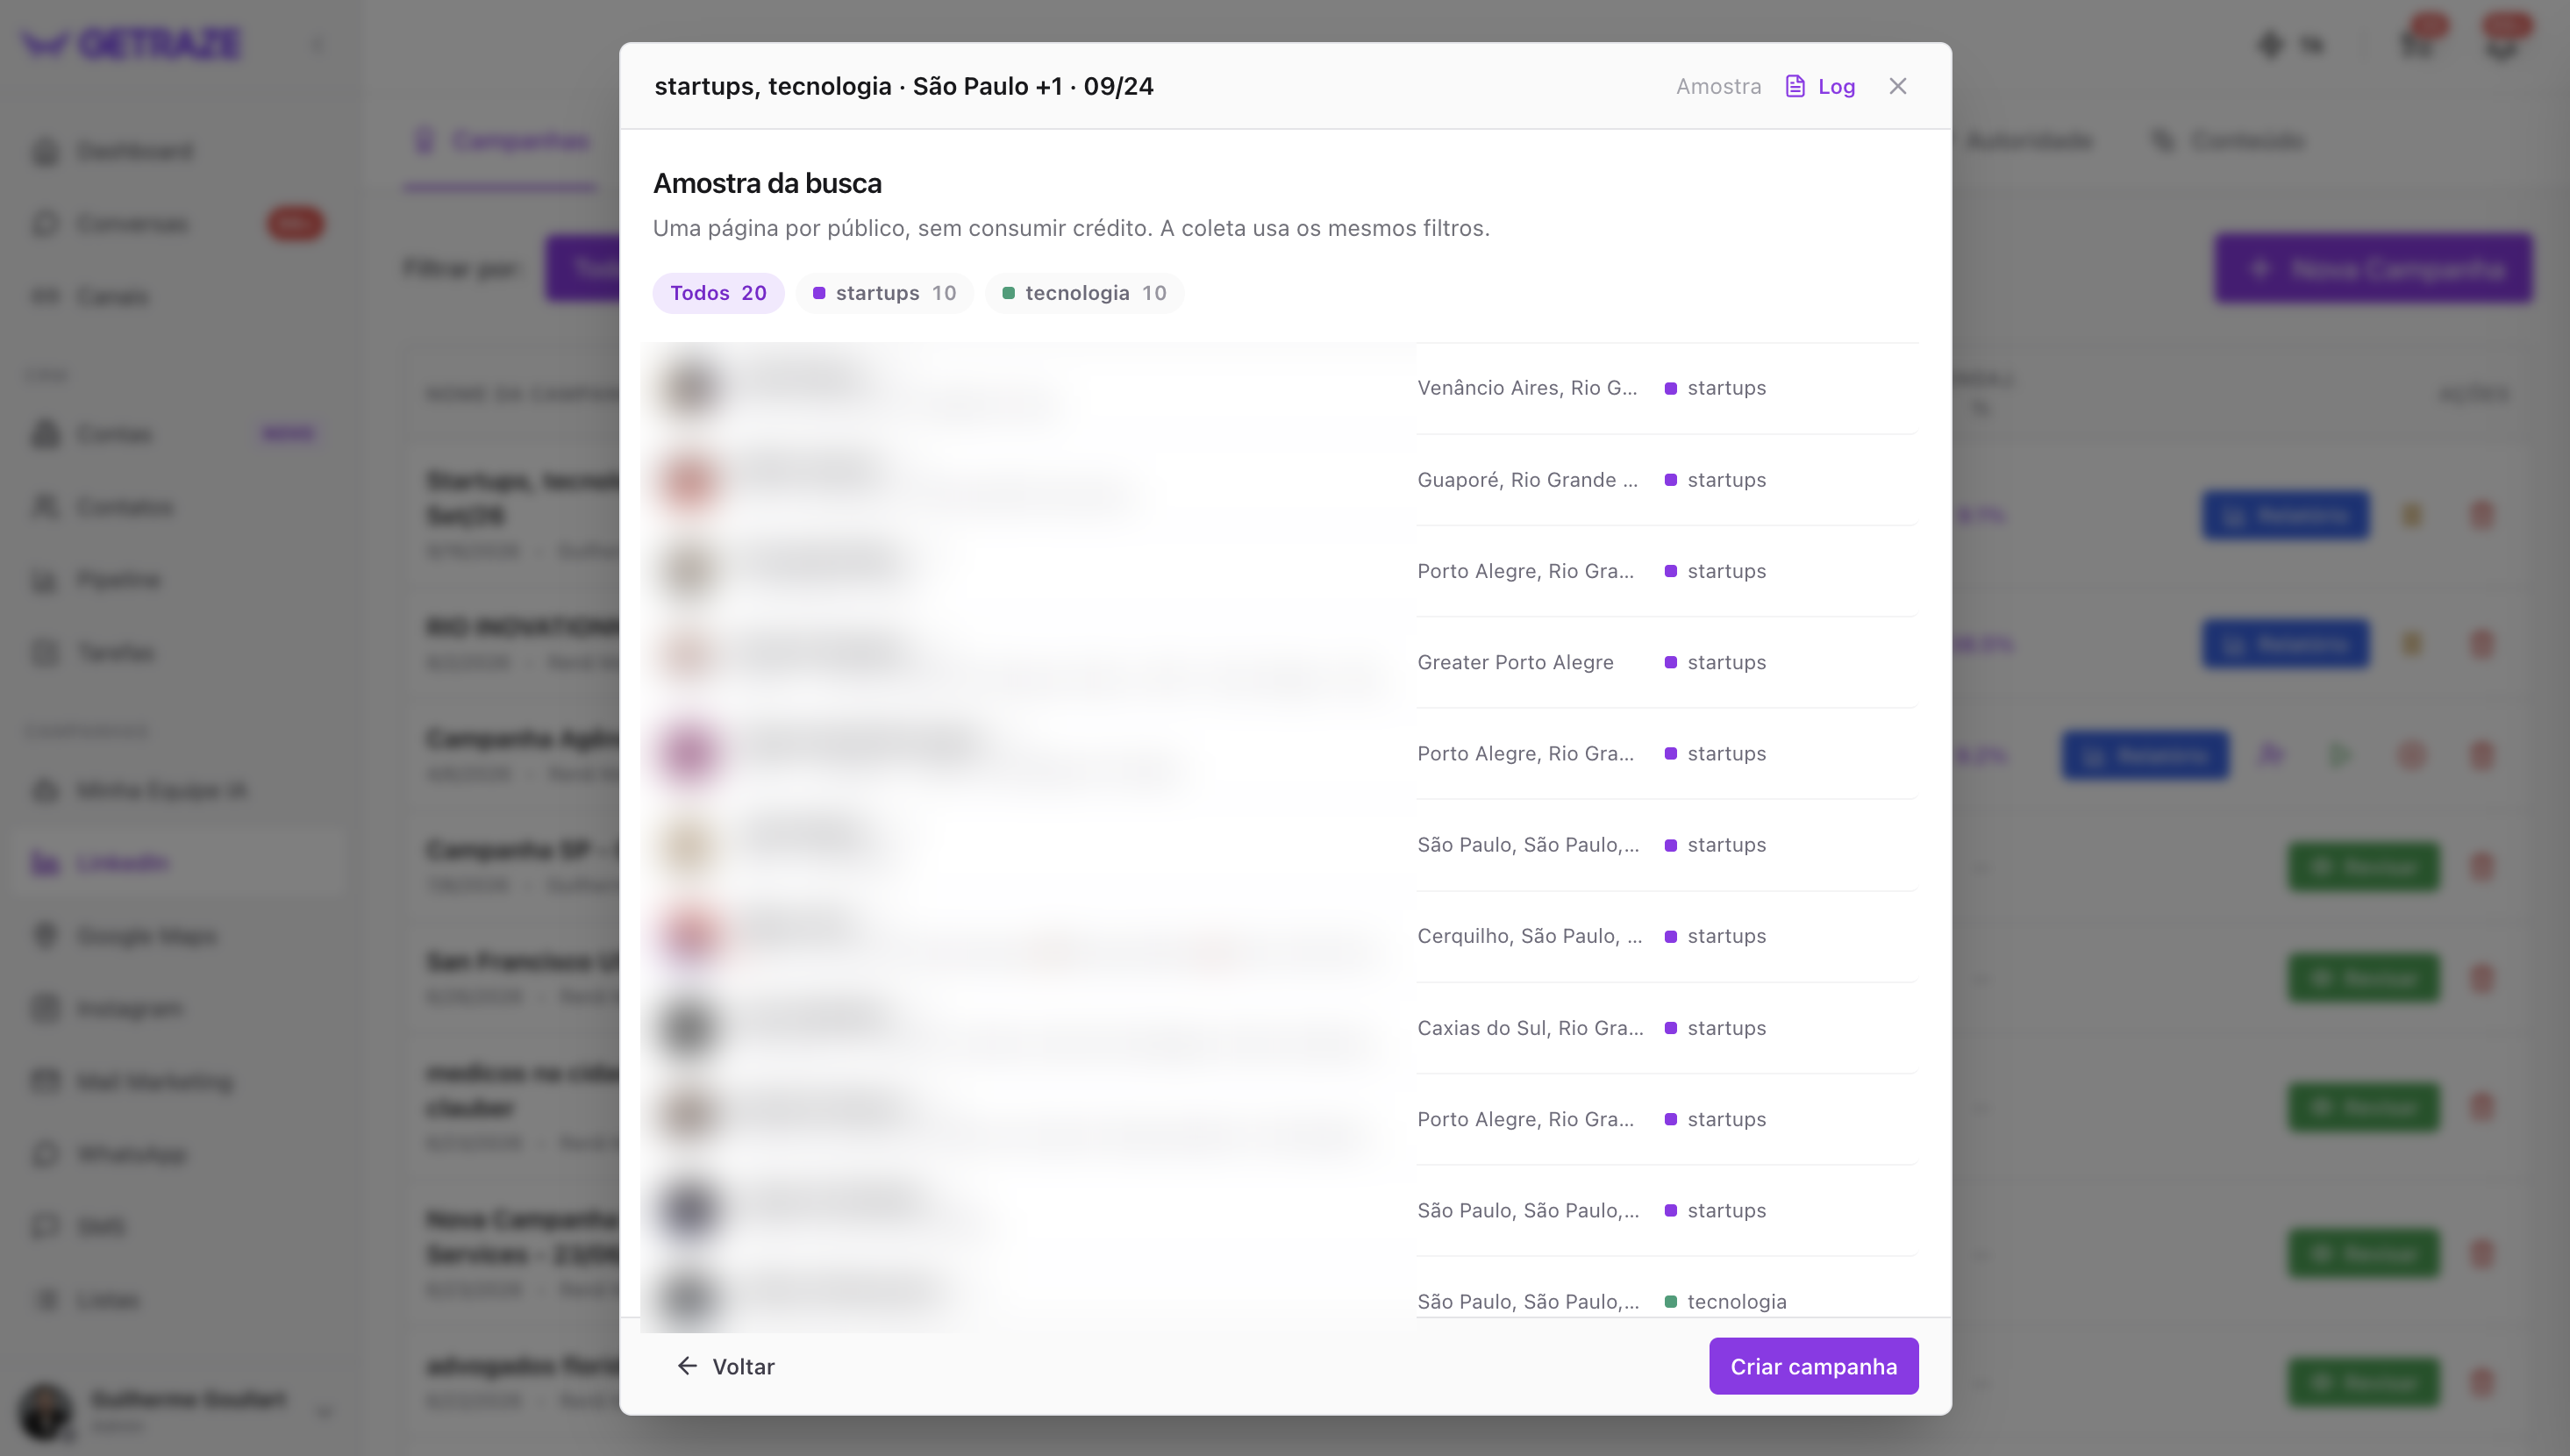
Use the tabs at the top to switch between All and each audience separately, and check the profiles: name, connection degree, job title, location and which audience each one belongs to.
💡 If the sample is far off from your ideal customer profile, click Back and adjust the filters until it represents well who you want to reach. This is the right moment — after the collection, the filters can no longer be changed.
When you are satisfied, click Create campaign.
Step 4 — Track the collection, review and activate
When you create the campaign, the window closes and the collection process starts — you will see the Collecting... status on the campaigns screen.
When GetRaze reaches the total number of profiles you set, the Review button will appear on the right. Click it.
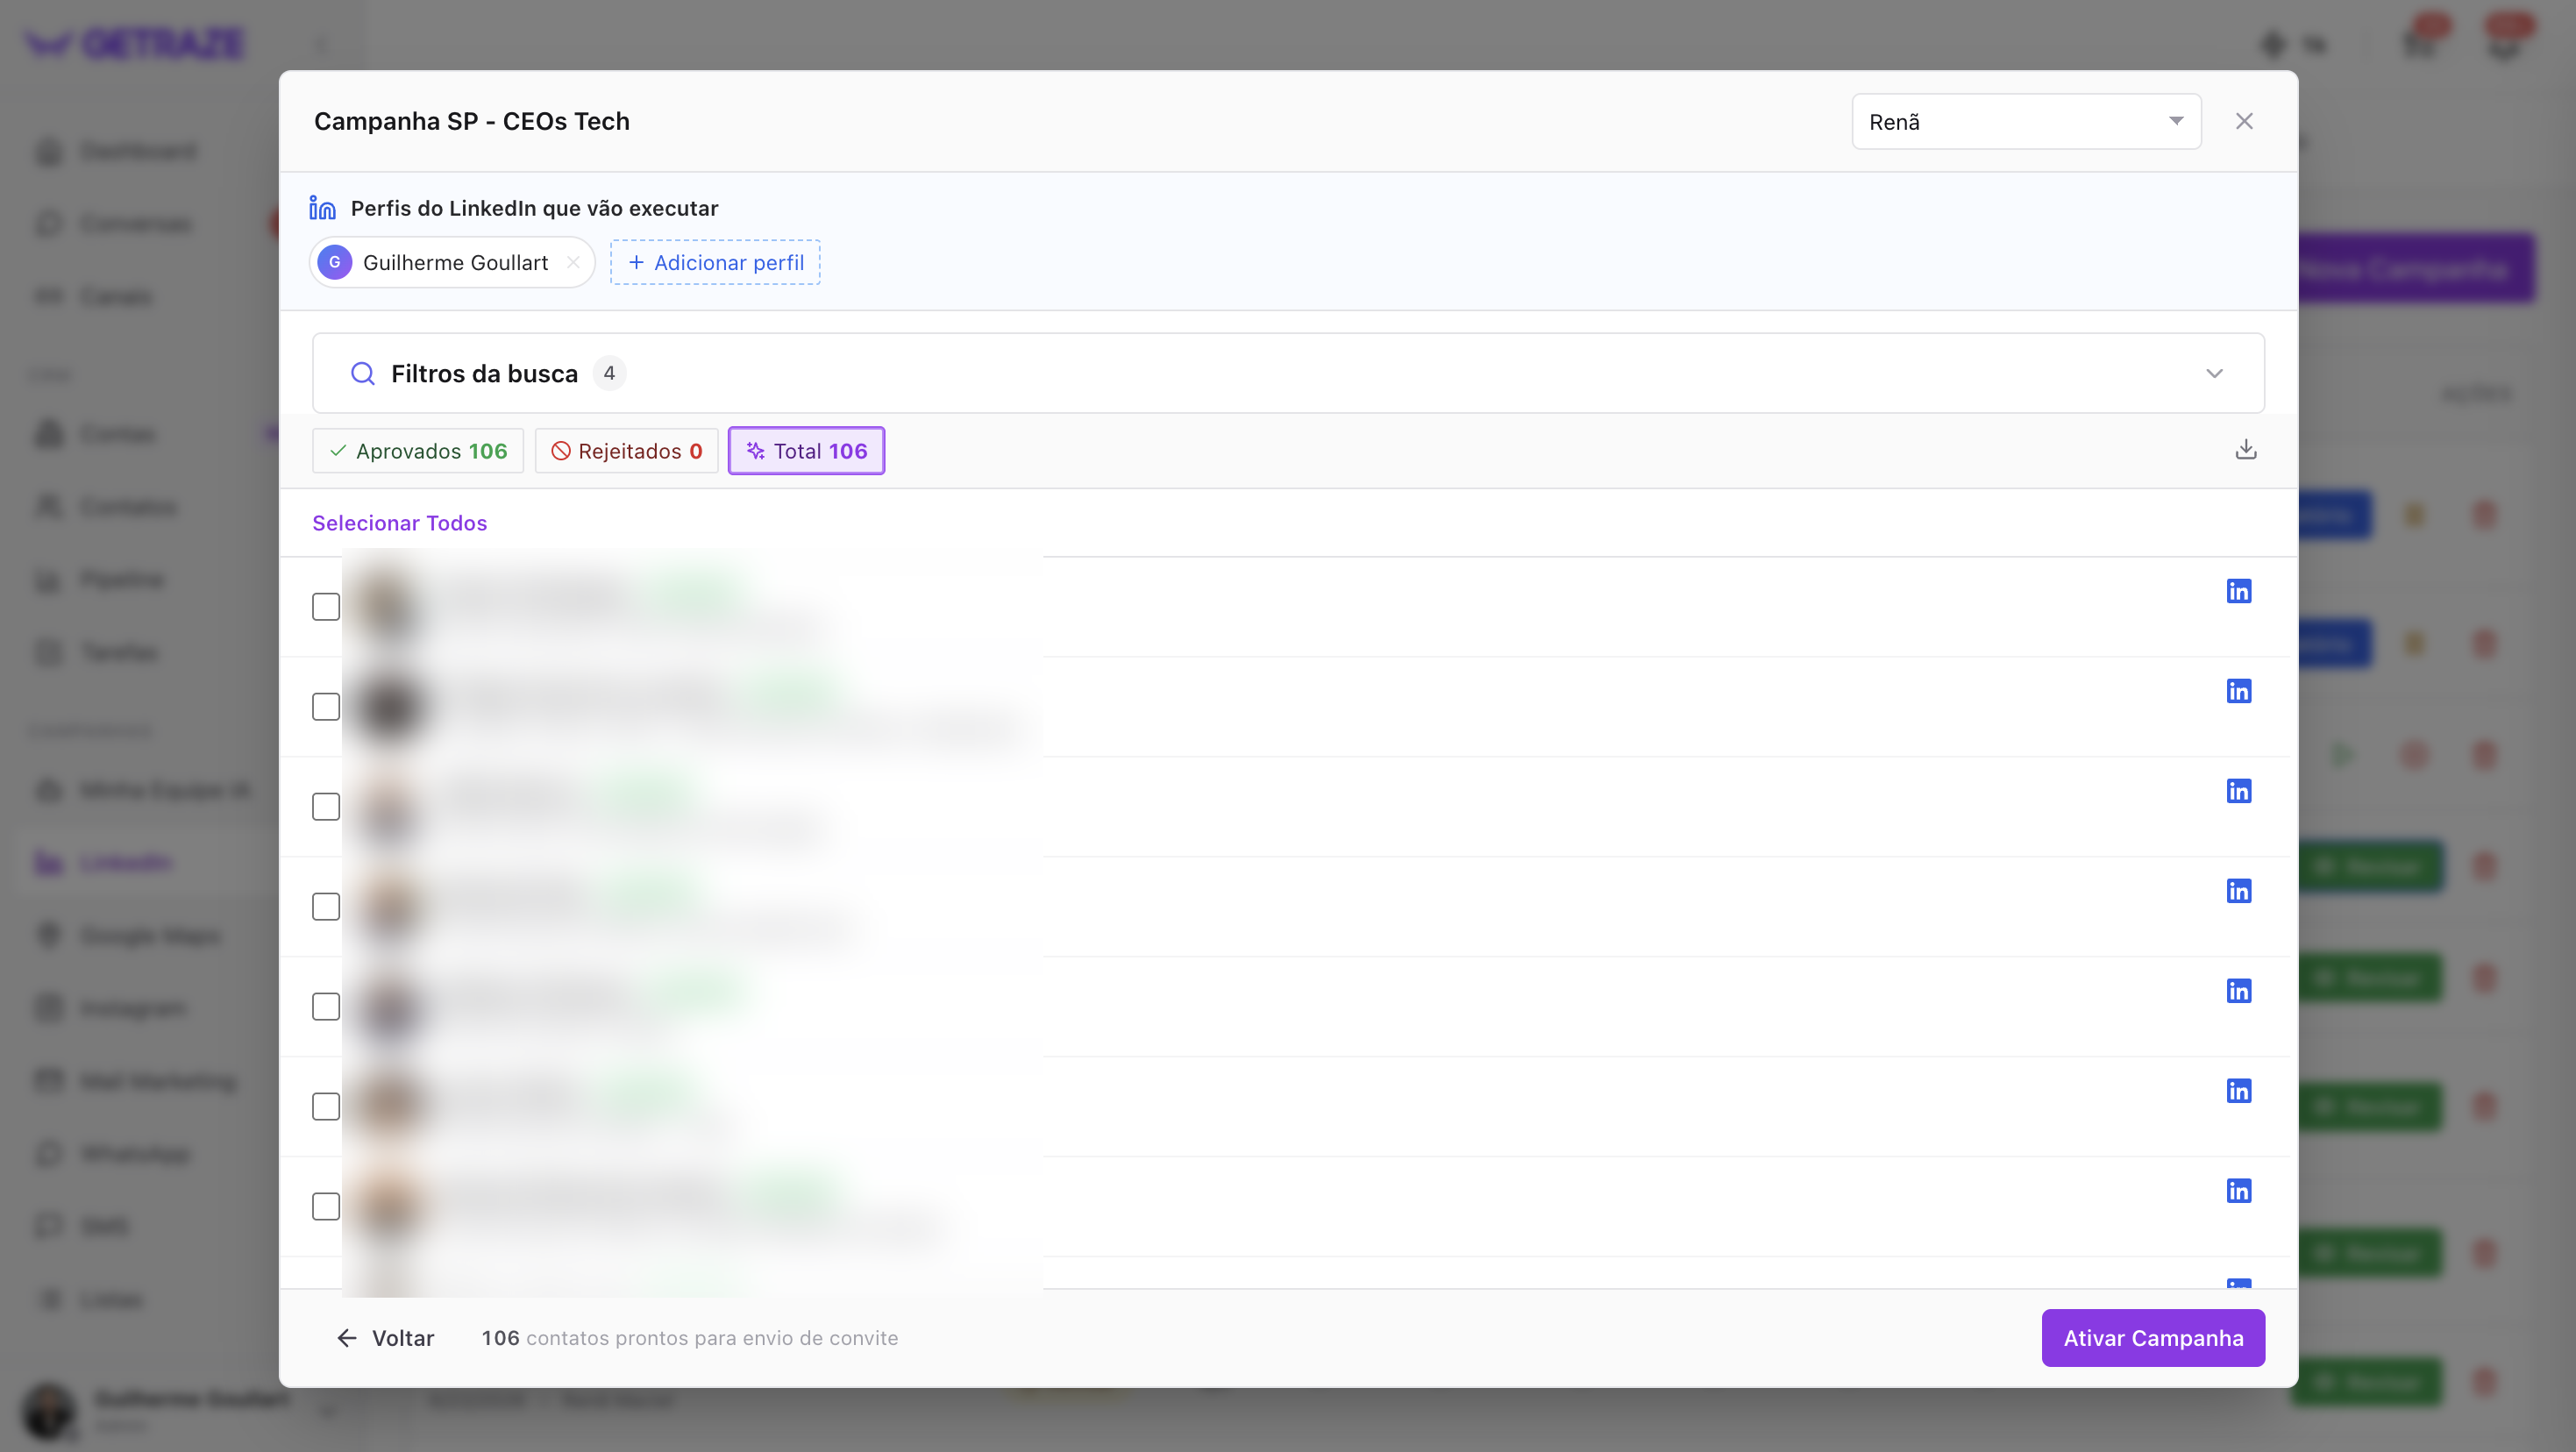
In the review, you see all the LinkedIn profiles found:
- All profiles come already approved;
- You can reject the ones you don't want — a rejected profile does not receive the invite and does not take part in the campaign;
- You can still add LinkedIn profiles or change the AI agent set up.
⚠️ Attention: at this stage it is not possible to change the search filters — keywords, job titles, industries or location. If you got any of these parameters wrong, you will need to redo the Find new people process.
To finish, click Activate Campaign. Done — your Find new people campaign is live! ✅
How to know it worked
- On the campaigns screen, your campaign shows up with the Active status;
- In the campaign's Report, the next scheduled invites start being displayed with their send times.
Common issues
I got a filter wrong (job title, keyword, industry or location) and the campaign has already collected
Search filters cannot be changed after the collection. Reject the review and redo the Find new people process with the correct filters. To avoid this, use the Search sample (Step 3) to validate the audience before creating the campaign — it does not consume credits.
An audience brought in job titles that make no sense
On the Review and create screen (Step 2), click the × on each job title or industry that doesn't fit. If the whole audience is wrong, use the trash can to remove it and redistribute the number among the remaining ones.
The campaign's invite volume is lower than I expected
Check whether the LinkedIn account is active in more than one campaign: when that happens, the daily sending limit is split evenly across them.
Next steps
- Track performance in the Campaign report;
- Set up your AI agent (coming soon) to automatically qualify whoever replies;
- Learn about the other campaign types to work your base and your lists.